- Go to “Pages” in the Course Menu and click on the screen button “+ Page” to create a new page.
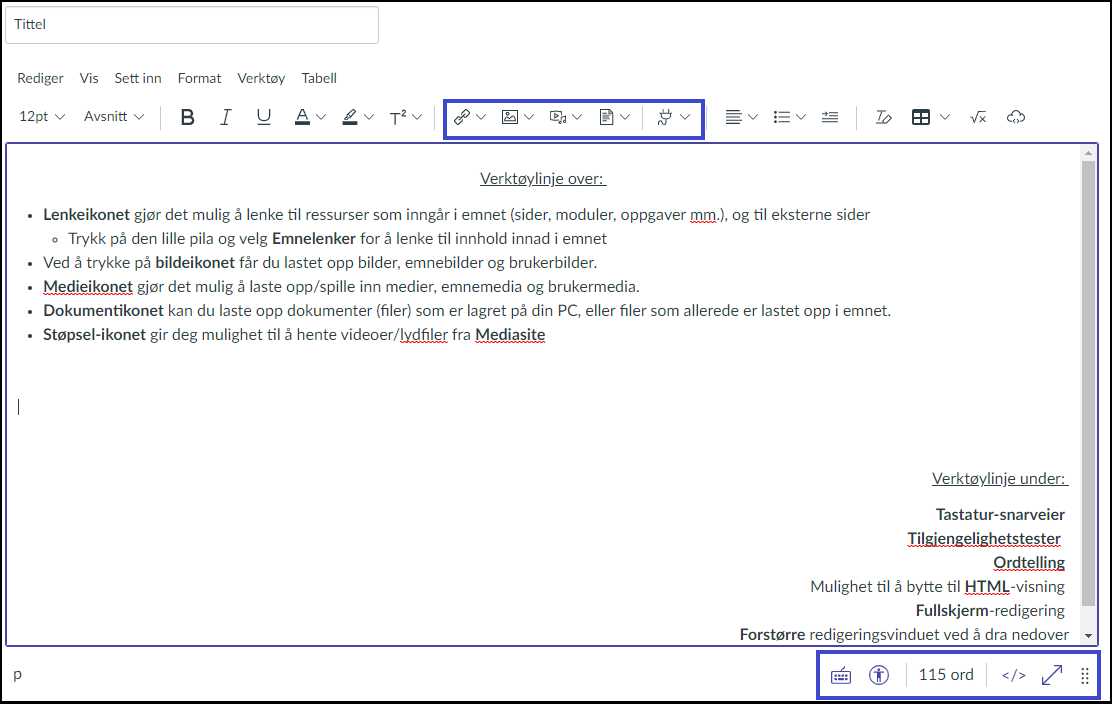
- You can link to Canvas content (files, assignments, modules, pages, discussions) by using the link tools when editing a page. The tools are identified by a blue rectangle in the text field in the screenshot below.
Click image to enlarge.
- You can set any page as your front page using the “dot menu” (three dots) on the top right of the page.
- The fact that a page is a front page does not mean that it automatically becomes the start page.
This is selected from the teacher’s Home Menu. .
- Go to or create a page in Canvas
- Select “Edit”, followed by “HTML editing” (the </> icon)
- Paste in the following code (this being the full URL for Dagbladet with a width of 1500 and height 1000 for the web page window. Replace Dagbladet’s URL with your own and set the desired dimensions of the window):
<iframe src="https://www.dagbladet.no" width="1500" height="1000"></iframe> - Click on “Save”
- Note that not all web pages give permission to be embedded, e.g. nrk.no
Canvas pages are not the same as pages in MS Word: they are web pages.
- A tip for controlling the width is to use a table as a text box. .
- Insert a table with a single cell (one row and one column), and type or paste text into it.
- To remove the border, go to Table > Properties (or click inside the table and select the icon farthest to the left) > “Advanced” tab and set “Border style” to “Hidden”.
- In the “General” tab you can control the width of the table, which usually defaults to 100%, or you can, for example, set the width at 700 px and adjust it if needed
You can merge cells in a row, so that some rows may have one cell per column while others have more
- Highlight the cells you want to merge, click on “Table” in the top menu bar and select “Cell”, followed by “Merge cells”
- Cells that are merged may later be divided by going through the same process and selecting “Split cell”
Yes, you can:
- Create a table
- Place your cursor in the table and create another table. This will appear within the first table.
- You can also create a table inside this one, and so on.
Wheels within wheels, to put it mildly!
Even if the border is set to “Hidden” (using table properties) lines within a table containing more than one cell will be visible.
You can remove the visible lines in HTML mode (</> icon):
- Find the table in question, which begins with <table
- Immediately after that you will see border="1"
- Use backspace to delete this and the visible lines within the table will also disappear.
- Upload an image to the page
- Click on the image and select “Format” in the top menu bar. Select “Align” and “Right”. The image will “float” to the right-hand side of the window
- Drag the ends of the image to adjust its size and the text will automatically follow
- To reduce the space between image and text to a minimum, enter HTML mode (</>):
- Find the image (if it is at the top of the page, it will be at the top of the HTML code). It begins with “<img”.
- Find style="float: right;"(the code that aligns the image to the right) and add left-margin:10px; before the last quotation mark (“), to create a margin of 10 pixels to the left of the image
- The beginning of the code for the image will then look like this: <img style="float: right; left-margin:10px;"
You must do this in HTML mode (</>).
- Enter HTML mode and identify the link you want to modify.
- A link always begins with <a, usually followed by href: and the address of the link.
- Immediately after <a, paste in the code style="text-decoration:none"
- Use spaces before and after the whole code, but not within it.
The link will now appear without underlining!
This must be done in HTML mode (</>)
- The attribute target="_blank" specifies whether or not a link opens in a new tab.
- If you want a link to open in a new tab, in the HTML code, find the link (which begins with <a) and ensure that the string target="_blank" appears somewhere within the element, before the next >
- If you don’t want the link to open in a new tab, make sure that target="_blank" is not part of the link element (i.e. it is not between <a and > in the link)
You must create the tabs themselves in HTML mode (</>):
- Paste in the following code to create two tabs:
- If you use edit mode you will see the text “content of tab 1”
- Delete this (using backspace) and insert a table consisting of one cell
- Go to the table properties (Advanced) and select border style=hidden
- Within this hidden one-cell table you can now insert all the content you want in Tab 1
- Do exactly the same with Tab 2
- Remove the names of the tabs (Tab 1, Tab 2) by using backspace and typing the text you want
You must do this in HTML mode (</>):
- Paste in the following code:
- UThe drawback with drop-down menus is that all further editing of the content must be done in HTML mode: Stay in HTML mode and replace the text in green with what you want to display in the drop-down menu.
- Drop-down menus are therefore best used by those who have some HTML experience. In such cases the above-mentioned code can be copied and pasted repeatedly to create additional drop-down menus.
- Just remember to add a new number (2,3, etc.) to “index” in each code to distinguish between the menus.
There are three index IDs per code (highlighted in the code above), which must have the same numbers if the code is to function.
- When you paste in text from MS Word, the format is retained by default (headings, bold type, paragraphs, etc.)