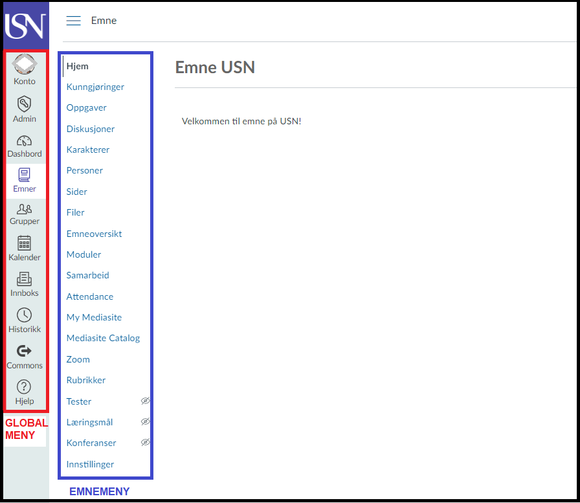
Click on the image to enlarge it
Global menu
The global menu is found in the far left
- Here you can add a photo, create settings for notifications, view a summary of your personal files, etc.
- From Account you can also log out of Canvas.
- The Dashboard is the first screen display you will see each time you log in to Canvas.
- Active course you teach can show up as “cards” on your dashboard. You can control this from the Courses menu (see below).
- Here you will find all the courses you have access to.
- On the Dashboard, you can set a star by any courses you wish to highlight.
- You will also find courses from previous years: Click on “All Courses” at the bottom and view “Earlier Enrolments” at the foot of the page.
- When you join a group, it will be shown here.
- As a teacher you automatically become a member of all groups created in your courses.
- Here you will see activities in your courses, such as deadlines for assignmentsYou will also see when classes take place (timetables are obtained from TimeEdit).
- You can also create events in the calendar, such as tutorial classes for which students can enrol.
- Click on a date in the calendar to add an event.
- Select the “Agreement category” tab, select course and time interval and select “Divide into windows of MM minutes”. This will create “windows” for which students can sign up in their calendars, e.g. for tutorials.
Remember to click on “Publish”.
- Write messages to students and read messages from students here.
- Students can reply either in Canvas or by e-mail.
- As a teacher you may also choose to continue corresponding by e-mail.
- Sharing: Here you can also search content from USN or other institutions in Norway and abroad that use Canvas. You can import content to your Canvas course. You can also export content to Commons, directly from your Canvas course.
- Read more about importing content from Commons here.
- Here you can submit questions or report problems to USN’s Canvas team. Select “Report a problem”.
Course Menu
You will find the Course Menu on the right when you are in the course.
You can decide which functions are to be displayed in the Course Menu. Only functions in active use shall be displayed.
This is the first thing students will see in the course.
You decide what Home is to be: A front page, Course Overview, Module Overview or Assignment Overview.
You can specify this and more by way of a separate menu that the teacher can display by clicking on “Home”.
You can also make the latest Announcements for the course visible at the top of the Home page.
- Announcements are open messages that usually apply to the entire course.
- You can arrange for the latest announcements to be permanently displayed on the Home page of the course.
- You can arrange for the latest announcements to be permanently displayed on the Home page of the course.
- Students may also receive notifications by means of announcements.
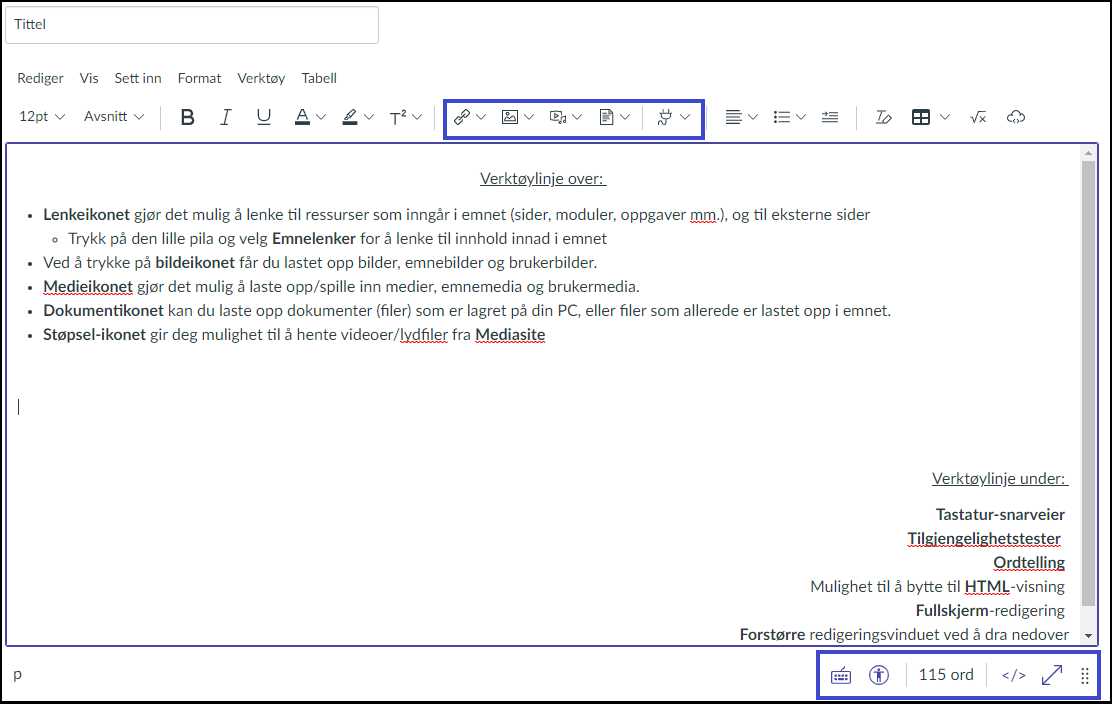
A page in Canvas is an empty web page that you can fill with content.
- Go to “Pages” in the Course Menu and click on the screen button “+ Page” to create a new page.
 Click on the image to enlarge it.
- Content in Canvas (pages, assignments, discussions) can be organised in modules, for example one module per lecture or one module per theme.
- Go to “Modules” in the Subject Menu and click on “+ Module”, type a name and click on “Add module".
- Click “+” on the right in the module to add content: You can select content that is already present in the Canvas course or create new content

- Click on the three dots on the right-hand side in the module screen, select from the menu in Canvas to change the order of content in modules, change order of modules, delete a module, etc.
- It is possible to control students’ access to content depending on what parts of the course they have completed.
- Here you can upload files and make them accessible to students.
- You can link the files to a page or a module.
- Remember that media files (audio or video) shall be uploaded using Mediasite, not directly in Canvas.
- Here you can create submission folders, for example, for mandatory assignments.
- There are many options, including group assignments and peer reviews.
- Read more about assessments in Canvas
- You can create more advanced assignments in the form of tests, for example multiple choice tests.
- Read more about tests
- Here you can view the students’ results from course assignments.
- If you use Attendance registration (see below), you can also check attendance here.
“Attendance” is Canvas’s own system for attendance registration.
- Also called assessment guidance.
- Create a form with criteria for assessment and feedback connected with assignments. May also be used in students’ peer reviews.
- Read more about Rubrics
- Create discussions for and with students or allow students to initiate discussions themselves.
- Read more about the use of Discussions for active student learning
- Overview of all students and teachers of a course.
- Here you will also find an overview of group set and groups, with opportunity for creating new group categories and groups.
- Create collaborative documents using Office 365 (Excel, PowerPoint or Word), directly in Canvas, and select which students shall collaborate.
- Students may also initiate collaborations themselves.
- Read more about collaborations in Canvas.
- An overview of all activities connected with a course: classes, assignments, etc.
- Can also be edited in the form of a page with text, illustrations, embedded videos, etc.
- Mediasite was USN's solution for storing and displaying audio and video.
From spring semester 2022, USN will switch to using Panopto.
Content in Mediasite will still be available, but from 1 March it will not be possible to upload new content in Mediastite.
- You can create Zoom classes directly in Canvas, so that all students can easily find the correct Zoom link
- Read more about Zoom
Settings are always at the bottom of the page and are only visible to the teacher.
Here you may, among other things:
