Procedures for using Zoom for research interviews
Sikt has an agreement with Zoom (by way of NORDUnet, the collaborative organisation for national data networks for research and higher education in Scandinavia), and supplies Zoom to USN and the rest of the sector. USN has a general data processing agreement with Uninett which applies to research interviews.
Planning and preparations
- When you plan an interview, consider carefully what sort of data you will be handling.
- Always weigh up the merits of group interviews versus individual interviews. Group interviews are not recommended when handling Red data, as it presents a greater risk of personal information getting into the wrong hands.
- Note: If you plan a Zoom meeting to replace a physical meeting in a research project, it may be necessary to apply to NSD for a change of use.
- If you have a USN PC, you are recommended to use this when you Host a meeting. If you want to record an interview, you MUST use a USN PC. See the separate requirements associated with recording interviews below.
- Always use USN's Zoom licence and FEIDE login credentials. Use of the free version of Zoom is not permitted. See "Installing Zoom Client". Installer Zoom-klienten.
- Check that you have downloaded the latest version of Zoom in plenty of time before the meeting starts. In the event of problems, contact the IT service desk. See "Updating Zoom". Oppdater Zoom.
- Familiarise yourself with Zoom as a tool and check that everything works using non-sensitive content.
- Obtain consent and distribute full information to participants beforehand.
Creating and convening a Zoom meeting
- Always use the following settings when creating a meeting: See "Creating a meeting in Zoom". Opprett et møte i Zoom.
- Use an automatically generated meeting ID, not a Personal Meeting ID.
- Do not reuse passwords for meetings.
- In the event of a group interview, consider requiring participants' video cameras to be switched off by default.
- Activate the waiting room function ("Enable waiting room" under "Advanced Options").
- Remove the option allowing participants to join the meeting before the Host (remove the tick from "Join before Host" under "Advanced Options").
- Never display the link to a Zoom meeting and the meeting ID openly. Instead notify people using e-mail, SMS or similar messaging services. If you send the link using Outlook, you must define the meeting invitation as private.
Conducting a Zoom meeting.
- Always ensure that no outsiders can view your screen during the conversation or can overhear the conversation itself. Use headphones where practical.
- If the interview concerns Red data, you should always lock the meeting once all participants have joined. This is also recommended for Yellow data.
- Repeat the information sent out prior to the meeting.
- If unauthorised persons obtain access, close the meeting immediately and notify edu@usn.no.
Recording Zoom meetings (supplementary requirements)
- Use only a PC belonging to USN if you intend to record a meeting.
- If you are a student without a USN PC that ensures proper saving of Zoom recordings, instead of using the recording function in Zoom you may proceed as follows:
- Use the University of Oslo's dictaphone app. See the University's guide to the app.
- If necessary, you may contact forskningsdata@usn.no to request assistance in finding an alternative solution.
- Plan a location for interim storage of downloaded data beforehand. See the Storage Guide (text in Norwegian).
- Carry out the necessary recording settings before recording commences. See "Planning the recording of meetings in Zoom".
- Change the storage location depending on the classification of the data (see above).
- Tick "Record a separate audio file for each participant who speaks".
- Tick "Add a timestamp to the recording".
- Ensure that "Keep temporary recording files" is not ticked.
- If anything occurs or is said during the meeting that needs to be deleted later, make a note of the time. This will enable you to find it and edit it out.
- After conclusion of the meeting, the recording will be downloaded to the selected location. This may take some time. Allow the computer to finish this before closing the lid or shutting it down. Check that the recording was placed in the correct location. Delete any unnecessary information. Audio files can, for example, be deleted if you are only going to use video, and video files can be deleted if you only need audio.
- Transfer the recording to its final storage location as soon as possible. Red data shall be transferred to TSD.
- Delete the interim copy.
(Text borrowed from OsloMet (Original text in Norwegian).
Collaboration with external researchers by using Zoom Channels
A Zoom Channel gives you a permanent location in which to write messages to any member. The history can be read as it develops by those wishing to catch up, find shared links, etc. Joint video meetings can also be conducted. This facility is useful for researchers, work experience tutors and similar groups who have a lot of external contacts.
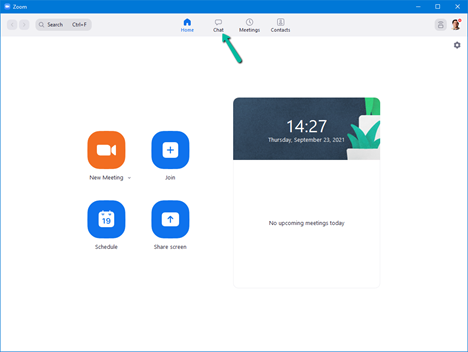
- Click on "Chat" in your Zoom Client (login is necessary):

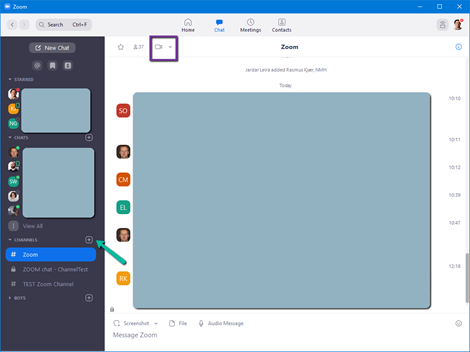
- Select "channels" from the left-hand menu and click on the "+" icon:

- Select "Create a Channel". You can add anybody who has an e-mail address.
- You may write in shared chats or click on the camera icon (small square at the top) to hold video conversations.
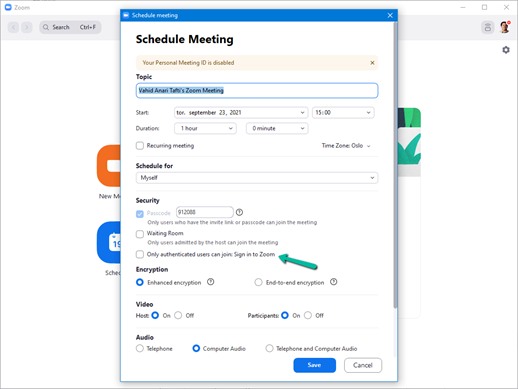
Note: External participants may be permitted to enter ordinary Zoom meetings, provided that "Only authenticated users can join: Sign in to Zoom" was not selected while planning a meeting (if one or more participants are external):

Note: If external users are unable to download Zoom Client because of their company's or organisation's policy, they may participate using the Zoom web client: https://support.zoom.us/hc/en-us/articles/214629443-Zoom-Web-Client