Before teaching commences
Download Zoom Client
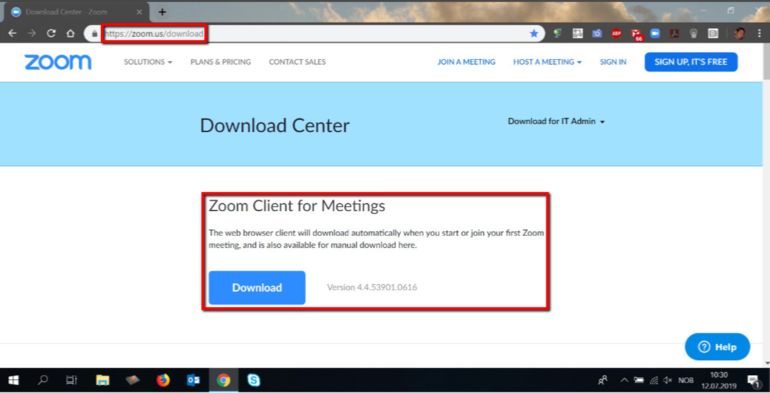
Download "Zoom Client for Meetings" directly at zoom.us/download
It should only be downloaded using this link.
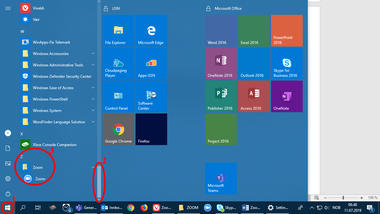
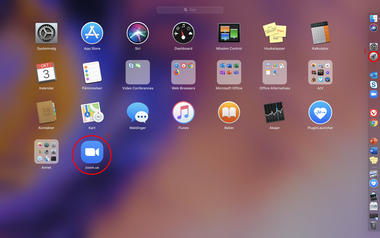
After downloading you will find it in the program list:
PC:
Click on the image to enlarge it
- Click on the start button.
- Programs are sorted alphabetically. Scroll down to Z.
- Click on the blue Zoom button.
Mac:
Click on the image to enlarge it
- Click on Launchpad.
- Click on the blue Zoom button.
Hint! In the Zoom Client settings you can choose to have the client start automatically when you log on to the computer. This may be practical if you often use Zoom.
Log in once to activate your USN User
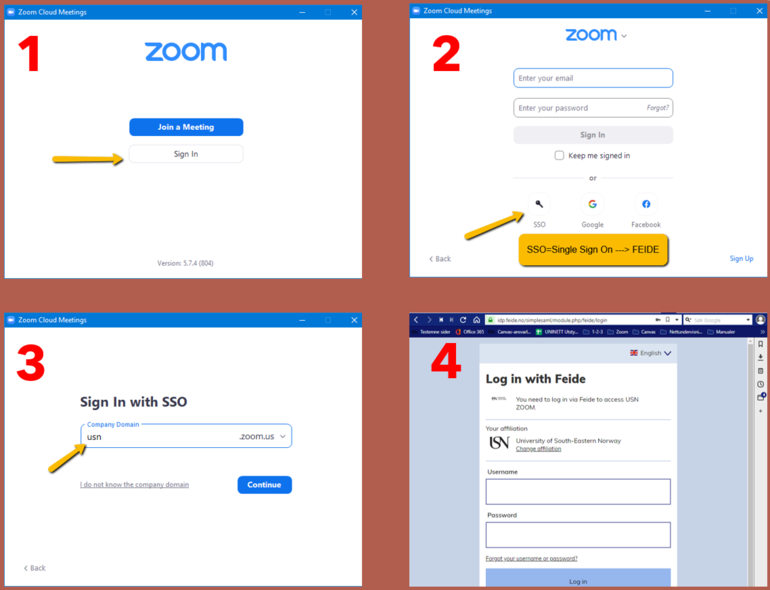
- When the download is complete a choice of sign in options will be displayed
- Select SSO
- Check that USN is in the field. It should appear automatically.
- Log in with your normal FEIDE login credentials, i.e. USN User Name and Password. If necessary, look for "Universitetet i Sørøst-Norge" for the correct affiliation.

Once the user has been authenticated you will be asked if you want to continue connecting in the browser. Confirm this.
Your Client will then look like this:
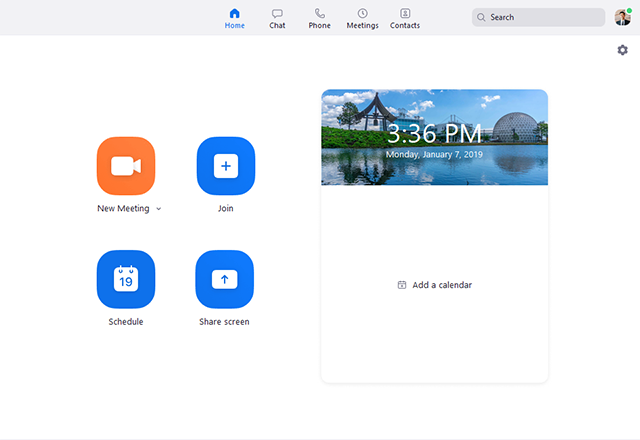
- If you don't log out of the client manually, it will remember your login credentials next time, so you won't need to log in again on your own machine.
- You may be logged in to Zoom on one computer, one tablet or one mobile phone at a time. If you are already logged in on one device, logging in on an additional device will automatically log you out on the first one.
- If you don't want to use Zoom Client, you can go to https://usn.zoom.us and select "Sign in", then "USN", and log in using your FEIDE login credentials to activate the user.
Ensure that Zoom is accessible in the Canvas Course Menu
Plan the Zoom teaching session directly using Canvas
Only persons with a teaching role can create Zoom meetings in Canvas.
- Click on "Zoom" in the navigation system, followed by "Schedule a New Meeting":
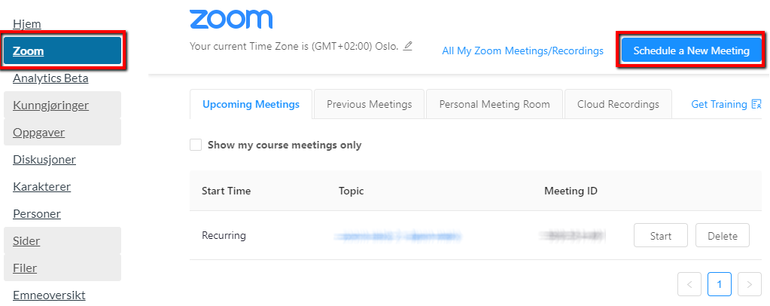
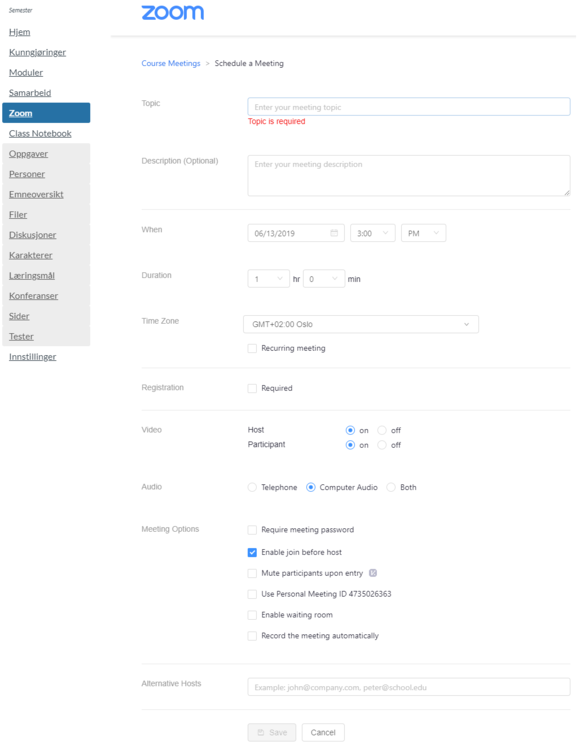
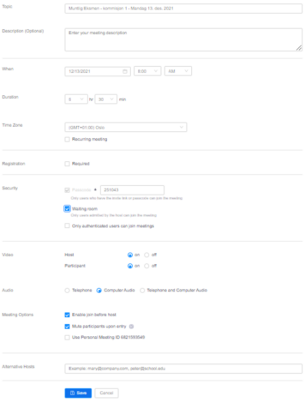
- Creating meeting settings:
Click on the image to enlarge it
- Topic: Type in a title. The more explanatory the Topic, the easier it will be to find the correct teaching sessions and any recording afterwards.
- Description: Type in a meeting description (optional).
- When: Select date and time for the meeting. American format is used. Date mm/dd/yyyy and 12-hour clock with AM/PM.
- Duration: Select an approximate duration for the meeting. This is for planning purposes only. The meeting will not finish at the end of this period.
- Time Zone: By default, Zoom uses the time zone specified in your profile. Click on the drop-down menu to set a different time zone.
- Recurring meeting: Determine whether you want a recurring meeting. The Meeting ID will remain the same for each session. This provides new options:
- Recurrence: Choose how often you want the meeting to take place: Daily, Weekly, Monthly or No Fixed Time (not recommended).
- A meeting may be repeated up to 50 times. If you need more than 50 repetitions, use the "No Fixed Time" option.
- You may configure the meeting to end after a certain number of repetitions or conclude the series of meetings on a specified date
- Registration: Tick this option if you want to require registration. Participants who are logged in to Zoom via FEIDE will not notice anything. Participants NOT logged in via FEIDE (such as guest participants) must register to obtain access to the meeting. After the conclusion of the meeting, the teacher will have access to a report.
If registration is required and the meeting is resumed, select one of the following options:- Attendees register once and can attend any of the occurrences: Participants can participate in all meetings. All dates and times for a meeting will be stated and participants will be registered for every meeting.
- Attendees need to register for each occurrence to attend: Participants must register themselves for each occurrence and may only select one date.
- Attendees register once and can choose one or more occurrences to attend: Participants register once and may choose one or more occurrences. They must choose the dates and times at which they wish to participate and will be registered only for these meetings. They may select several alternatives.
- Video:
- Host: Decide whether video is to be on or off when the meeting commences.
- Participant: Decide whether a participant's video is to be on or off when the meeting commences. Even if you select "off", participants will be able to start their own video.
- Audio: Choose whether to allow participants to take part using only "Telephone", only "Computer Audio" or both.
- Meeting Options:
- Enable join before host: Permit participants to enter the Zoom meeting before the teacher arrives
- Mute participants on entry: When participants enter, their microphones are switched off. Recommended. They can unmute themselves when necessary.
- Enable waiting room: Permits the Host to control when participants may join the meeting by placing them in a waiting room.
- Use Personal Meeting ID: We recommend you not to choose this, so that each online teaching session has its own unique link.
- Alternative Hosts: Type in the e-mail address of another Zoom user who holds a USN licence: in other words, a student or employee at USN. This person will then be able to start the meeting in your absence.
- Enable join before host: Permit participants to enter the Zoom meeting before the teacher arrives
- Click on "Save" to complete.
Planning co-teaching in Canvas
- Create a Zoom link in the first Canvas room and copy your Meeting ID.
- Open the other Canvas room.
- Select Zoom in the subject menu.
- Click on the three dot menu.
- Click on ‘Import Meeting’.

- Paste the copied Meeting ID into the dialogue box.
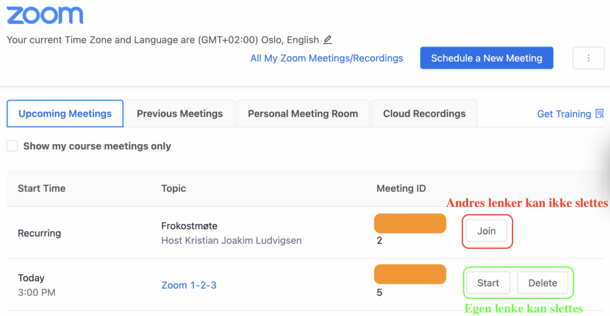
NB 1: You can import both your own Meeting ID and your colleague’s Meeting ID.
NB 2: Once you have imported your colleague’s Meeting ID, you cannot delete it if you change your mind:
Attendance registration in Zoom
For Zoom to register attendance the Host must tick the "Registration:Required" box when an online teaching session is planned in Canvas.
- Participants who are logged in to Zoom as USN users will not notice anything.
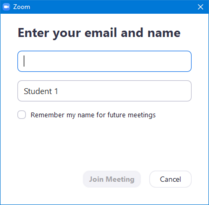
- Participants who are NOT logged in as USN users (such as guest participants) must register when they click on the "Join" button
Accessing a report:
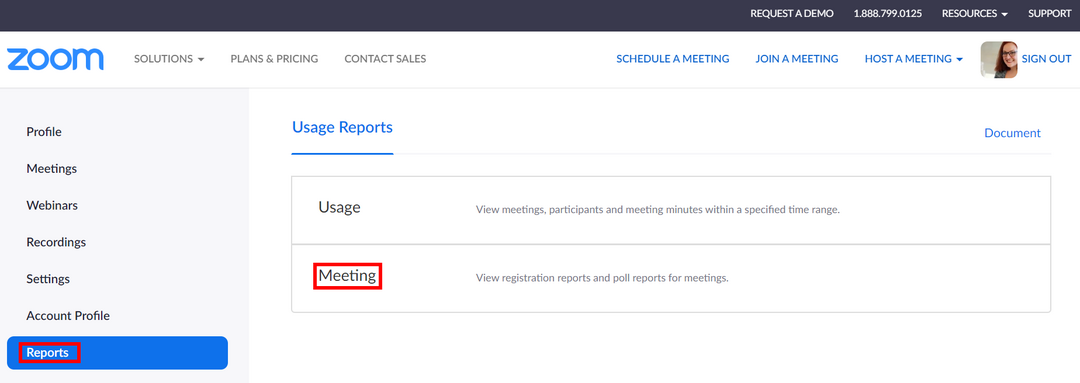
- A teacher logs on to Zoom via https://usn.zoom.us
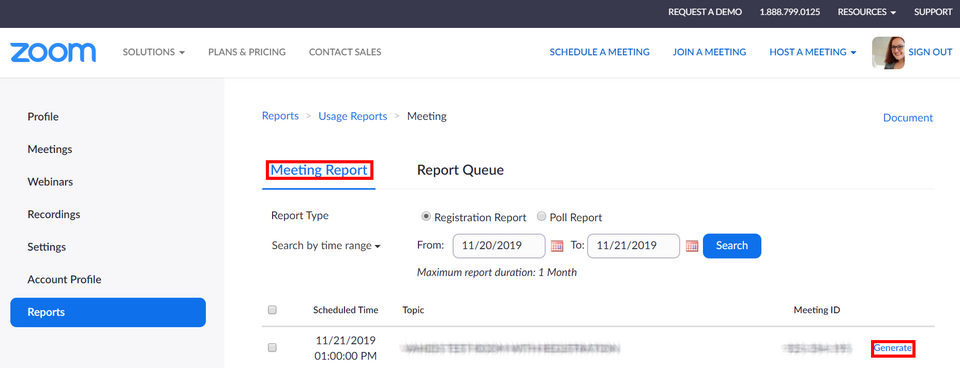
- Click on "Reports", followed by "Meeting":
- Select "Registration Report" as "Report Type" under "Meeting Report", select search dates and click on "Search". Find the meeting in question and select "Generate":
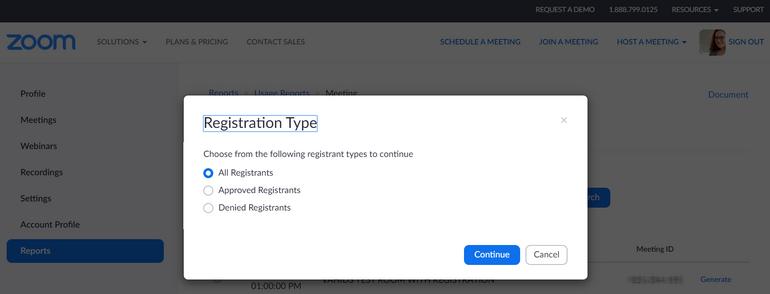
- Select "All Registrants":
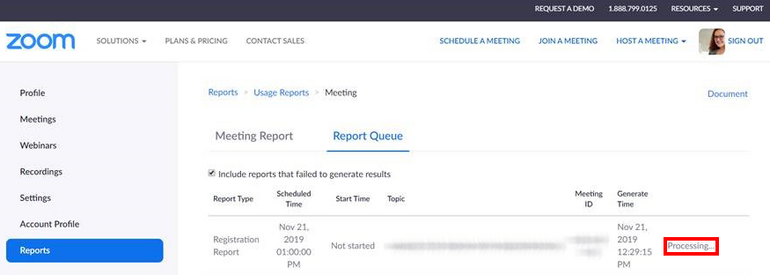
- Wait for the process to complete:
- Download the file:
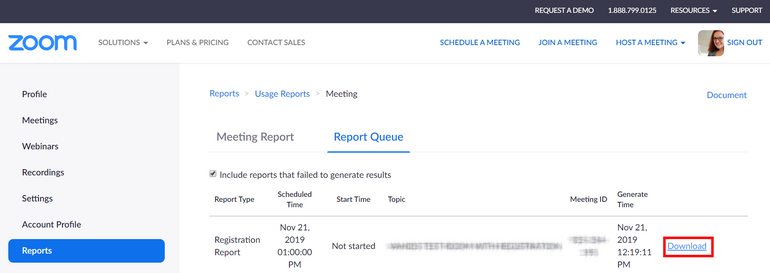
- The file is in .csv format and can be opened in Microsoft Excel:
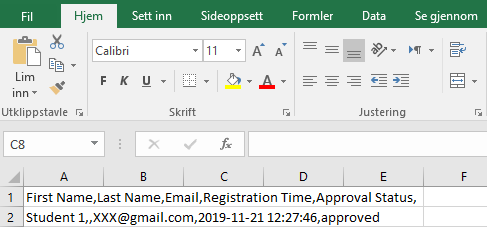
To arrange the data in columns in Excel:
- Highlight Column A by clicking on "A"
- Select the "Data" page tab and "Text to Columns"
- Select "Delimited" for data type/file type
- Select "Comma" as delimiter and click on "Finish"
Now all text selected imported to Column A will be imported into single columns based on the use of commas as data separators.
During online teaching
Starting a Zoom teaching session in Canvas
- Click on "Zoom" on the Canvas Course Menu.
- Click on the "Start" button alongside your planned online teaching session:
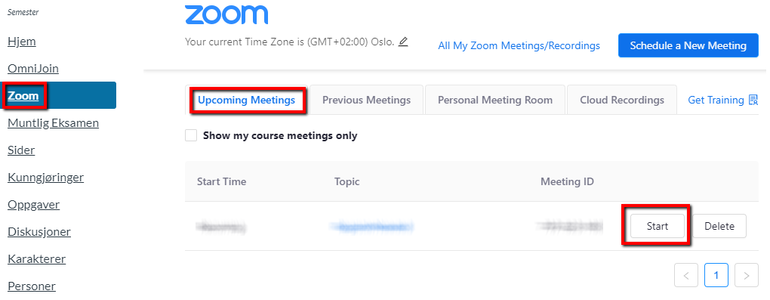
- Zoom Client will start automatically.
- Note: The date and time are only for guidance. The link may be used before and after the chosen point in time.
Using the toolbar during online teaching

Host has access to the following functions:
- Mute/Unmute: switches the microphone on and off.
- Volume controls (click on the ^ arrow next to Mute/Unmute) enable you to change the microphone and speaker settings, test the speaker and microphone, and gain access to all audio settings.
Tips! The following keyboard shortcuts can be used for Mute/Unmute:
- Mac: Shift + Command + A
- Windows: Alt + A
To temporarily Mute/Unmute, hold down the spacebar on your keyboard.
- Start/Stop Video: switches the camera on and off.
- Video controls (click on the ^ arrow next to Start/Stop Video) enable you to change the camera settings, select a video filter or fuzzy/virtual background (such as the USN logo or avatar) and gain access to all video settings.
- Video controls (click on the ^ arrow next to Start/Stop Video) enable you to change the camera settings, select a video filter or fuzzy/virtual background (such as the USN logo or avatar) and gain access to all video settings.
- Security:
- Lock Meeting enables the Host to lock a meeting. Remember, however, that if a participant drops out due to a problem with the internet connection, he/she cannot return before the Host unlocks the meeting again.
- Enable Waiting Room allows the Host to activate a waiting room while a meeting is in progress.
- Hide Profile Pictures. On clicking Stop Video, a profile picture is shown for those who have uploaded a picture in advance. Host is able to hide this as well.
- Allow Participants (to). This enables the Host to grant/remove entitlements to/from Participants.
- Start Video
- Suspend Participant Activities (you can suspend participant activities).
- Share Screen
- Chat
- Rename Themselves
- Unmute Themselves
- Participants enables you to see who is attending the meeting.
- When you click on the ^ arrow next to Participants you can invite someone to the meeting or copy the meeting link and forward it via e-mail, etc.
- When you click on the ^ arrow next to Participants you can invite someone to the meeting or copy the meeting link and forward it via e-mail, etc.
- Chat activates a chat function between participants and the Host.
- If you click on the ^ arrow next to Chat you can activate/deactivate Chat Previews.
- If you click on the ^ arrow next to Chat you can activate/deactivate Chat Previews.
- Share Screen. In principle, all participants can share a screen in Zoom unless the Host (the person responsible for the meeting) has determined otherwise.
- If you click on the ^ arrow next to Share Screen you can select settings related to who can share, how many can share, etc.
- If you click on the ^ arrow next to Share Screen you can select settings related to who can share, how many can share, etc.
- Polls/Quizzes. Host is able to create Polls/Quizzes both in Meeting and in advance. Host/Co-Host can open Polls/Quizzes during the meeting.
- Record. As Host you can make recordings of a meeting/teaching session and give permission to others to make recordings.
- Reactions. This enables feedback to be provided on screen.
- If you click on the ^ arrow next to Reactions you can activate/deactivate Hand Gestures. For example, if Hand Gestures is activated and you raise your hand in front of the camera, an icon will appear on screen.
- If you click on the ^ arrow next to Reactions you can activate/deactivate Hand Gestures. For example, if Hand Gestures is activated and you raise your hand in front of the camera, an icon will appear on screen.
- Whiteboards. This enables you to share a Whiteboard that has been created out of Meeting.
- If you click on the ^ arrow next to Whiteboards you can select those persons with whom you wish to share.
- If you click on the ^ arrow next to Whiteboards you can select those persons with whom you wish to share.
- More:
- Start Focus Mode. The Host/Co-Host can use settings to ensure that participants are unable to see each other.
- Start Focus Mode. The Host/Co-Host can use settings to ensure that participants are unable to see each other.
- Leave Meeting enables the Host to conclude a meeting for all participants, or leave the meeting and hand the role of Host over to one of the other participants.
Tracking students' attention
If you want to use attention tracking, you must click on the "Manage Participants" icon in the tool bar when you start the online teaching session. A clock icon appears in the list of participants beside any participant who has clicked away from the active Zoom window for more than 30 seconds.
![]()
Be aware that participants may use Zoom without direct focus on the screen by having it open on a separate screen or alongside some other software application, for example while taking notes using MS Word. Hence, although you may see the indicator, this does not necessarily mean that a participant is not being attentive.
Oral exam on Zoom
Creating a Zoom link to an examination in Canvas
Important! Create one link for each examination day, and one for each examination panel.
- If you have three examination days involving two panels on each day, you will need six links.
- Each examiner must create his/her own Zoom links for his/her respective panels.
- Click on Zoom in the navigation system, followed by ‘Schedule a New Meeting’:
You can now select parameters for the Zoom link that you intend to use.
Complete the following fields:
- Topic. Enter a title for the examination. The more explanatory the Topic, the easier it will be for students to find the right examination link.
- Description. Enter a description of the examination (optional)
- When: Select the date and time (using American format):
- Date: mm/dd/yyyy.
- Time (24-hour clock): AM = 00:00–11:59, PM = 12:00–23:59.
A small rule of thumb is to think of the alphabet (A before P) in relation to mid-day.
Remember! An online examination must be held between 09:00 and 15:30. Examiners must be aware that IT support is not available outside these times.
- Duration. Select an approximate schedule for the entire examination day. This is intended as a guide, so you can extend the examination day while still using the same link.
- Time Zone. As default, Zoom uses the time zone specified in your profile, i.e. GMT +01:00 Oslo. If you need to set a different time zone, you will find this in the drop-down menu.
- Recurring Meeting: This must not be selected.
- Recurring Meeting: This must not be selected.
- Registration. This must not be selected.
- Security:
- Only authenticated users can join meetings. This must not be selected.
- Remember! Tick ‘Waiting Room’. This is essential!
- Passcode is mandatory and is already selected for all meetings at USN.
- Video. Select ‘On’ for both Host and Participant.
- Audio. Select ‘Computer Audio’.
- Meeting Options:
- Use Personal Meeting ID. This must not be selected.
- Mute participants on entry. This must not be selected.
- Enable Join before Host. Tick this option. This enables students to log in without having to wait for the person who ‘owns’ the room to log in. The students will thus be placed in the Waiting Room and not in the Zoom meeting.
- Alternative Hosts. If internal and external examiners are not sitting in the same physical room, it is recommended that an internal examiner creates the link and enters the e-mail address(es) of the external examiner(s).
- Remember! Use your USN and not your private e-mail address.
- On the date of the examination, both the internal and external examiner(s) shall log in using SSO (FEIDE).
- Click on Save to complete.
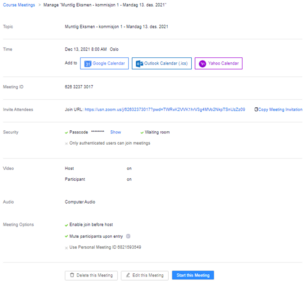
It will look like this:
Once you have clicked on Save you will see that the link has been created. If you want to send the link to an external examiner who does not have access to USN Canvas, you can copy both the link and meeting invitation and send them by e-mail:
The link will then be available to all students in the navigation system in the relevant Canvas course (Canvasemne). They will be able to find the link to the examination under Upcoming Meetings:
Using Waiting Room during oral examinations online
Remember to tick ‘Waiting Room’ during planning in Canvas.
- When a student clicks on ‘Join’ in Canvas, he/she will receive a message to wait until the teacher grants him/her access to the examination room.
- The teacher will then receive a message that the student is waiting:
- Once the student is in the examination room, the teacher can, if he/she wishes, return the student to the waiting room by clicking on ‘More’ next to the student’s name:
- If the next student clicks on the link before the preceding student is finished, he/she will be placed in the waiting room. If an examiner wishes, he/she can send a message to a student who is waiting:
- When a teacher/examiner is ready to let the student in, this can be done by clicking on ‘Admit’
